Two-Factor authentication is a form of authentication which requires the user to confirm their identity by more than just a username and password. There are three types authentication factors from which two must be used. The factors are knowledge (username/password), possession (sending a text message to a phone) and inheritance (fingerprint). This type of authentication has recently become more popular thanks to Google, Twitter and Facebook all adopting multi-factor authentication as an option. If you don’t have this enabled for your accounts, please stop reading this and enable it before you do anything else.
I started writing this post before the Heartbleed SSL vulnerability announced last week. I’m hoping that will bring more awareness and attention to multi-factor or passwordless authentication. Multi-factor authentication isn’t just for Google, if you deal with personally identifiable information then you should be trying to make your user’s data as secure as possible. Luckily, creating a two-factor authentication process with grails and spring security isn’t terribly difficult.
This is going to be the first of a two part series. All of the code can be seen on github of course. I will tag each version as it gets updated for the next blog post. The code is currently tagged as ‘step1’.
The first factor in this example is a knowledge factor requiring the user to know a username and password. The second factor, which will be in Part 2 of this series, will be a possession factor. It will use the Twilio api to send a text message with a one-time use token. The user will provide this token and then be fully authenticated.
Overview of solution
Spring Security uses Authentication Filters and Authentication Providers to do most of the heavy lifting.
- The first step of authentication will use the existing
UsernamePasswordAuthenticationFilterandDaoAuthenticationProviderto verify the user’s username and password. - Then the user will be given a temporary role which only gives access to a single page.
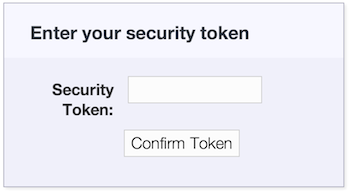
- The user will be prompted to enter a security token that was sent via text message.
- Then there will be a custom
TextMessageAuthenticationFilterandSecurityTokenAuthenticationProviderwhich will verify the security token. - After this second step in the authentication process is completed successfully, the user will be granted their roles from the the database.
NB: There are probably multiple ways to do this with Spring Security. This is how we did with a legacy application that had many existing users and roles already.
Walkthrough
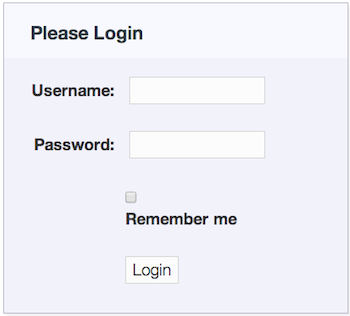
The first step is to generate the spring-security scaffolding using grails grails s2-quickstart org.kyleboon User Role. Then I added a dummy user in the bootstrap just for demonstration purposes. You can log in to the example application with user1/password1.
I created a simple HomeController that is protected by default. I pointed the root url to that HomeController.
package org.kyleboon.security

import grails.plugin.springsecurity.annotation.Secured
import org.kyleboon.Role

class HomeController {
    def beforeInterceptor = {
        println "Tracing action ${actionUri}"
    }

    @Secured([Role.ROLE_NORMAL])
    def index() {
    }
}
You should be able to start the application and log in and be directed to the HomeController index action.
What we want is to force the user to a secondary login page after a successful username and password authentication. To accomplish this, there is a new Role called “ROLE_STEP_ONE_AUTHENTICATED”. Then I created a custom UserDetailsProvider bean that will override the roles coming from GORM and give the UserDetails object a single role.
package org.kyleboon

import grails.plugin.springsecurity.userdetails.GormUserDetailsService
import org.springframework.security.core.GrantedAuthority
import org.springframework.security.core.authority.SimpleGrantedAuthority
import org.springframework.security.core.userdetails.UserDetails

class StepOneUserDetailsProviderService extends GormUserDetailsService {

    public static final String ROLE_STEP_ONE_AUTHENTICATED = "ROLE_PRE_AUTH"
    public static final List<GrantedAuthority> PRE_AUTH_ROLES = [new SimpleGrantedAuthority(ROLE_STEP_ONE_AUTHENTICATED)]

    @Override
    protected UserDetails createUserDetails(def user, Collection<GrantedAuthority> authorities) {
        return super.createUserDetails(user, PRE_AUTH_ROLES)
    }
}
And then wire this to the daoAuthenticationProvider bean that the Grails Spring Security plugin uses by default.
daoAuthenticationProvider(DaoAuthenticationProvider) {
        it.autowire = true
        userDetailsService = ref('stepOneUserDetailsProviderService')
    }
Now after logging in, every page will redirect you to the LoginController.denied() controller method. Finally, have the denied controller method redirect to a new page that will handle the second step of the authentication process. Tracing the controller actions will give something like this:
Tracing action /login/auth
Tracing action /login/denied
Tracing action /login/steptwo
class LoginController extends grails.plugin.springsecurity.LoginController {
    def beforeInterceptor = {
        println "Tracing action ${actionUri}"
    }

    def denied() {
        if (ifAnyGranted(StepOneUserDetailsProviderService.ROLE_STEP_ONE_AUTHENTICATED)) {
            redirect action: 'steptwo'
        }
    }


    def steptwo() {

    }
}
And create a GSP for step two.
<div id='login'>
    <div class='inner'>
        <div class='fheader'><g:message code="securitytoken.header"/></div>

        <g:if test='${flash.message}'>
            <div class='login_message'>${flash.message}</div>
        </g:if>

        <form action='${postUrl}' method='POST' id='stepTwoLoginForm' class='cssform' autocomplete='off'>
            <p>
                <label for='textcode'><g:message code="securitytoken.label"/>:</label>
                <input type='text' class='text_' name='j_textcode' id='textcode'/>
            </p>
            <p>
                <input type='submit' id="submit" value='${message(code: "securitytoken.button")}'/>
            </p>
        </form>
    </div>
</div>
<script type='text/javascript'>
    <!--
    (function() {
        document.forms['stepTwoLoginForm'].elements['j_textcode'].focus();
    })();
    // -->
</script>
That’s it for part one of two-factor authentication. At this point if user1 logs in, every page will redirect to the step two authentication page. In the next part of this blog series we’ll complete step two and add the Twilio API for text messaging a security code to the end user.